“The angel said to the women, “Do not be afraid, for I know that you are looking for Jesus, who was crucified. He is not here! He is risen from the dead, just as he said.”

Creating a Legacy though the things I love – Fiber Arts, Flora, Food, Faith and Fun


“The angel said to the women, “Do not be afraid, for I know that you are looking for Jesus, who was crucified. He is not here! He is risen from the dead, just as he said.”

“But He was pierced for our transgression; He was crushed for our iniquities; upon Him was the chastisement that brought us peace, and with his wounds we are healed.”


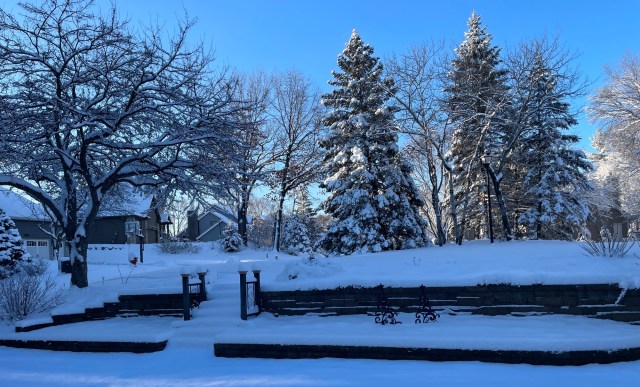
Winter has finally decided to show up in Minnesota. No, I’m not complaining about the previous lack of snow. I have really been enjoying the snow-free days that we have had. But, now that we now have snow outside, I am sharing pictures of some fused glass projects I have recently made.
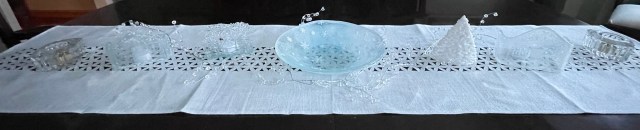
To update the winter table decorations for my dining room, I created a mini winter scene.
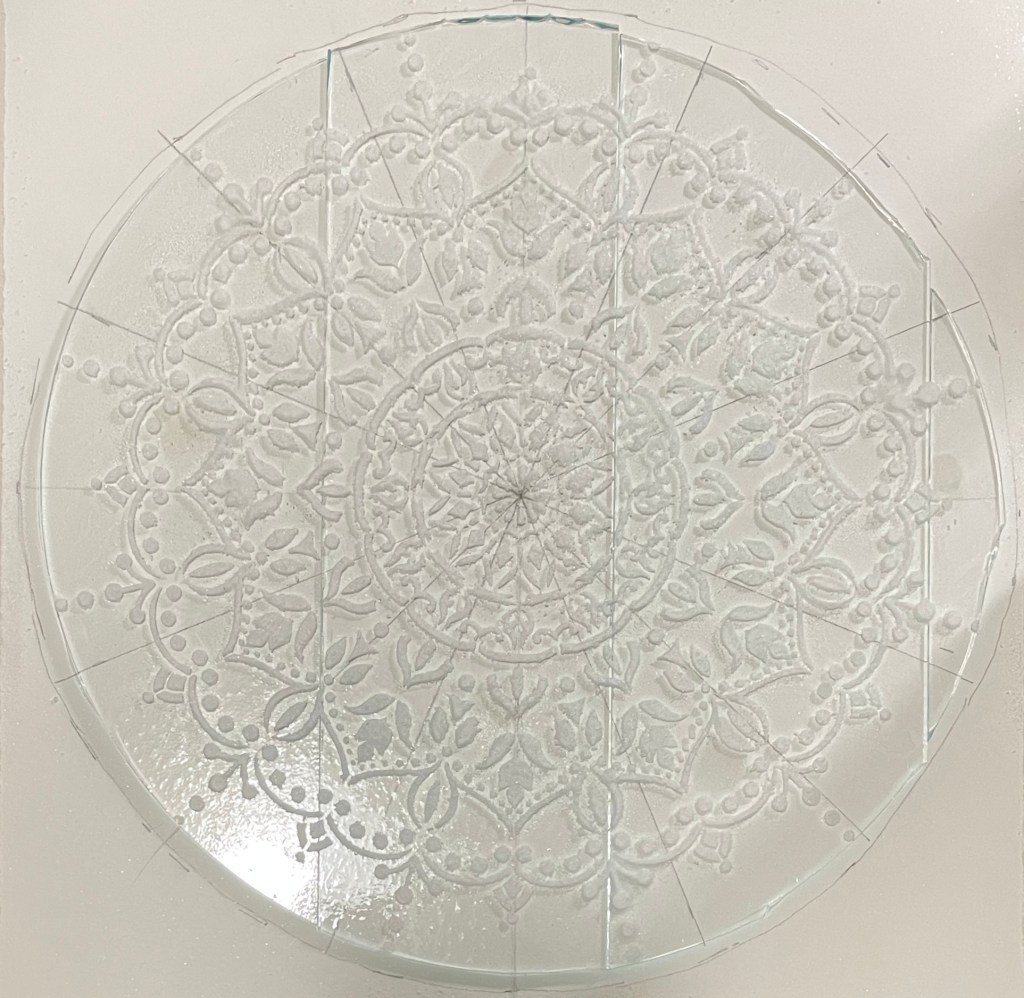
Snowflake Bowl. 12″ circles with frit, mica and glass clay, full fused and slumped.


Scrap Glass Evergreen Tree. 6″ equilateral triangle of opal white glass, topped with bits of scrap white, contour fused and slumped over an arch.

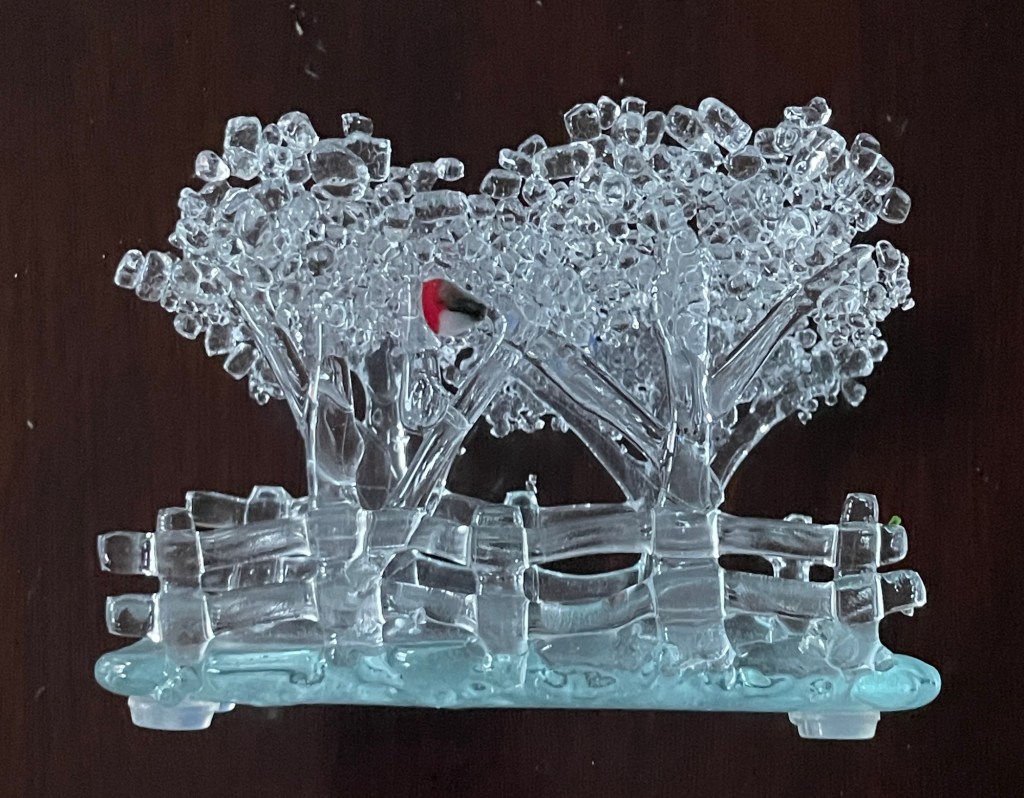
Winter Trees and Fence. Scraps of clear glass and coarse frit, with a bird added to either side for some interest. This can actually double as a napkin holder.

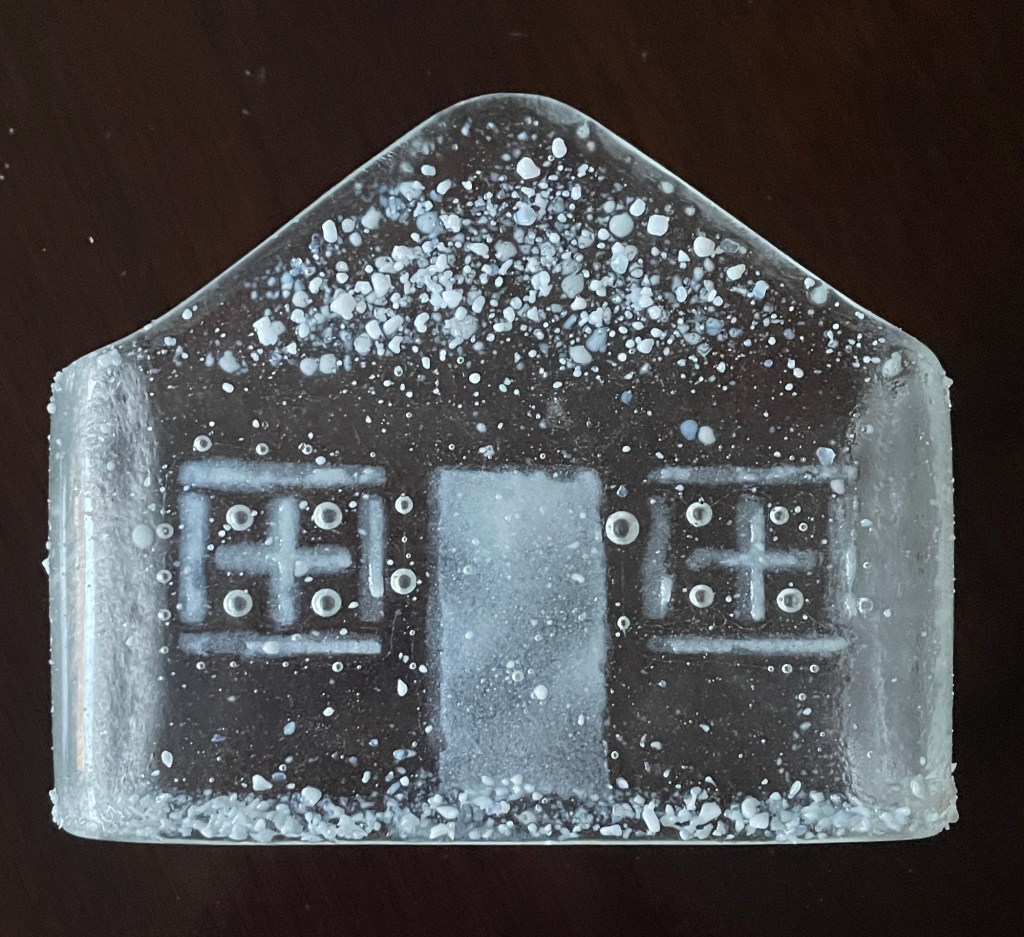
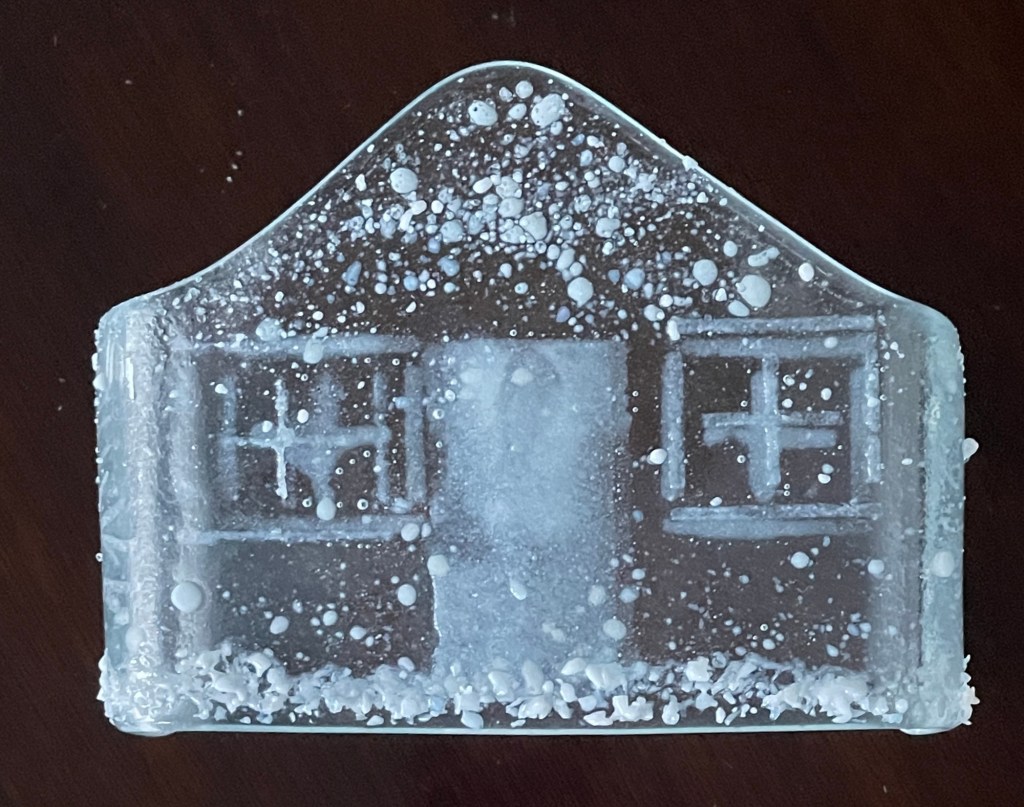
Snow Houses. Pieces of clear glass, cut to shape and full fused. White frit powder was stenciled on to make the door and windows and coarse white frit was used to add “snow”.
On the table. A cutwork table runner and a garland of crystal beads, completes the decor.
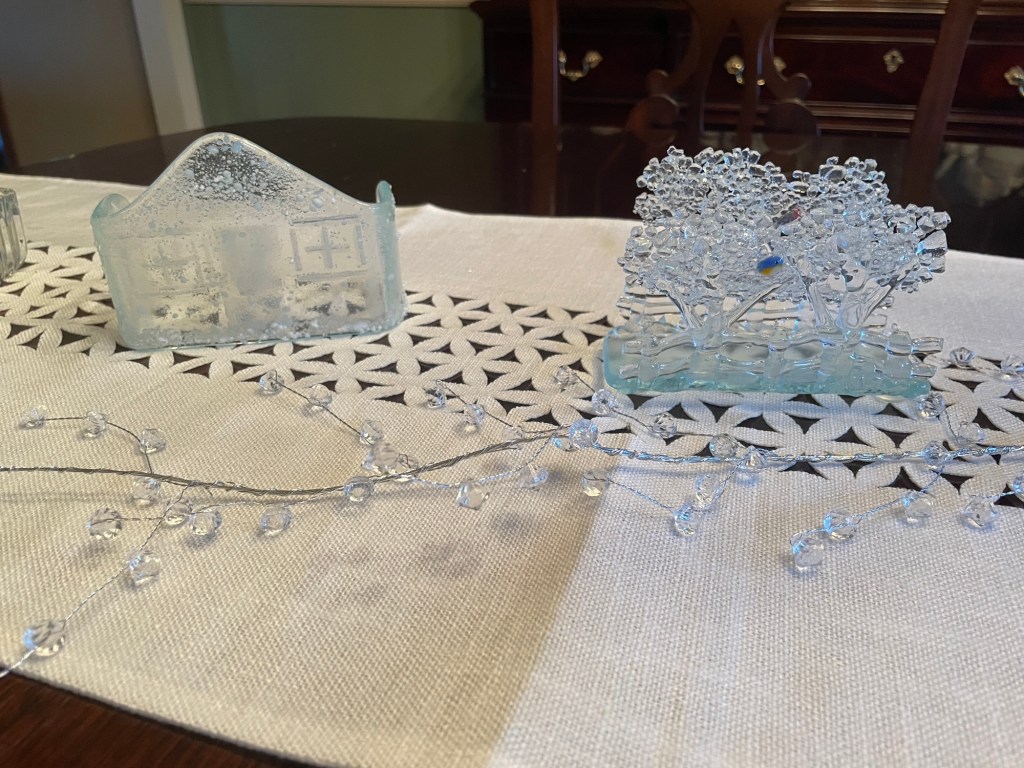
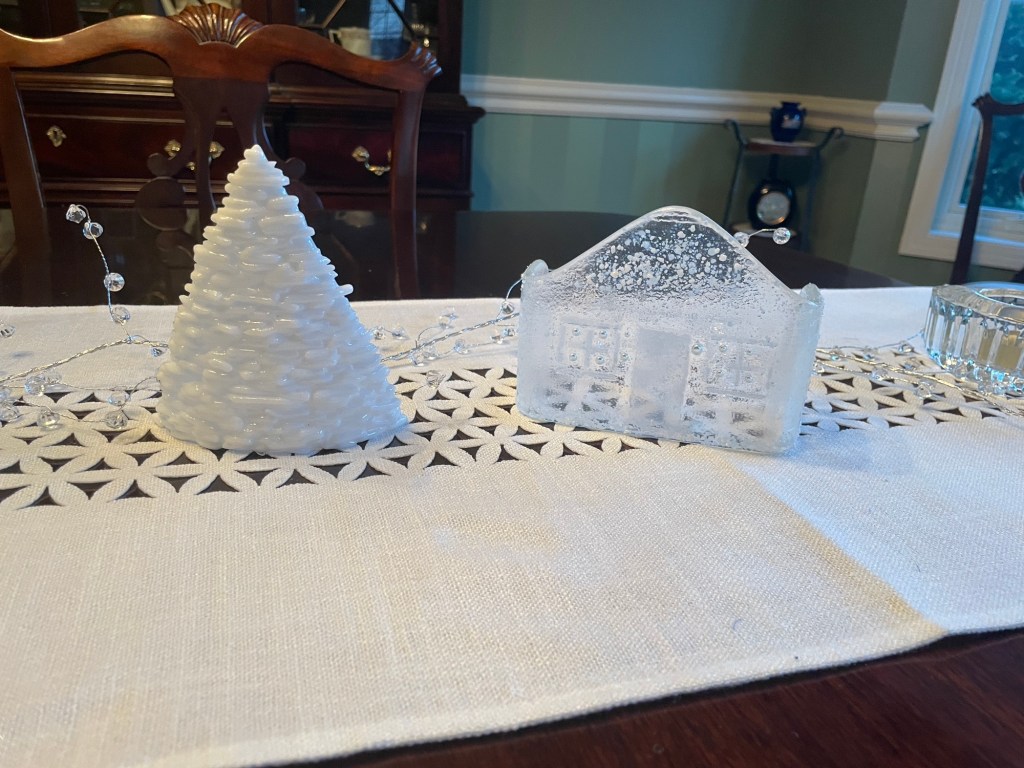
At night I can add some tealights behind the houses for some more sparkle in the room!

A few weeks ago, I participated as a vendor at a Holiday Market hosted by a local church. The market was a fund raiser for local missions. I was pleased to be part of that effort.
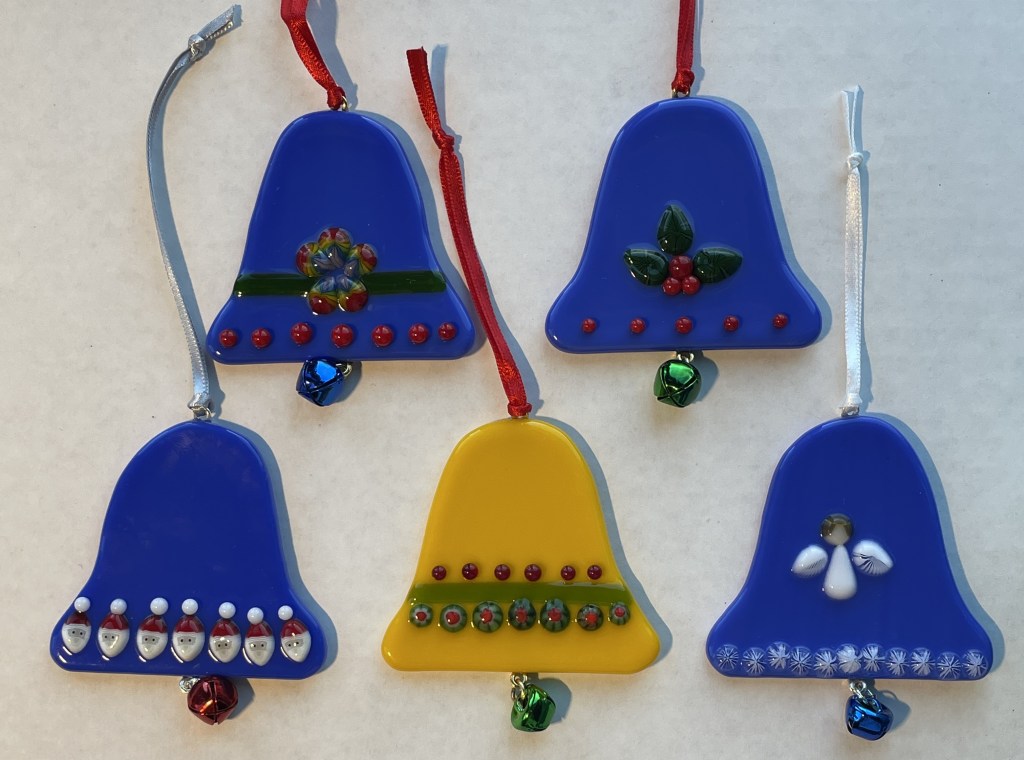
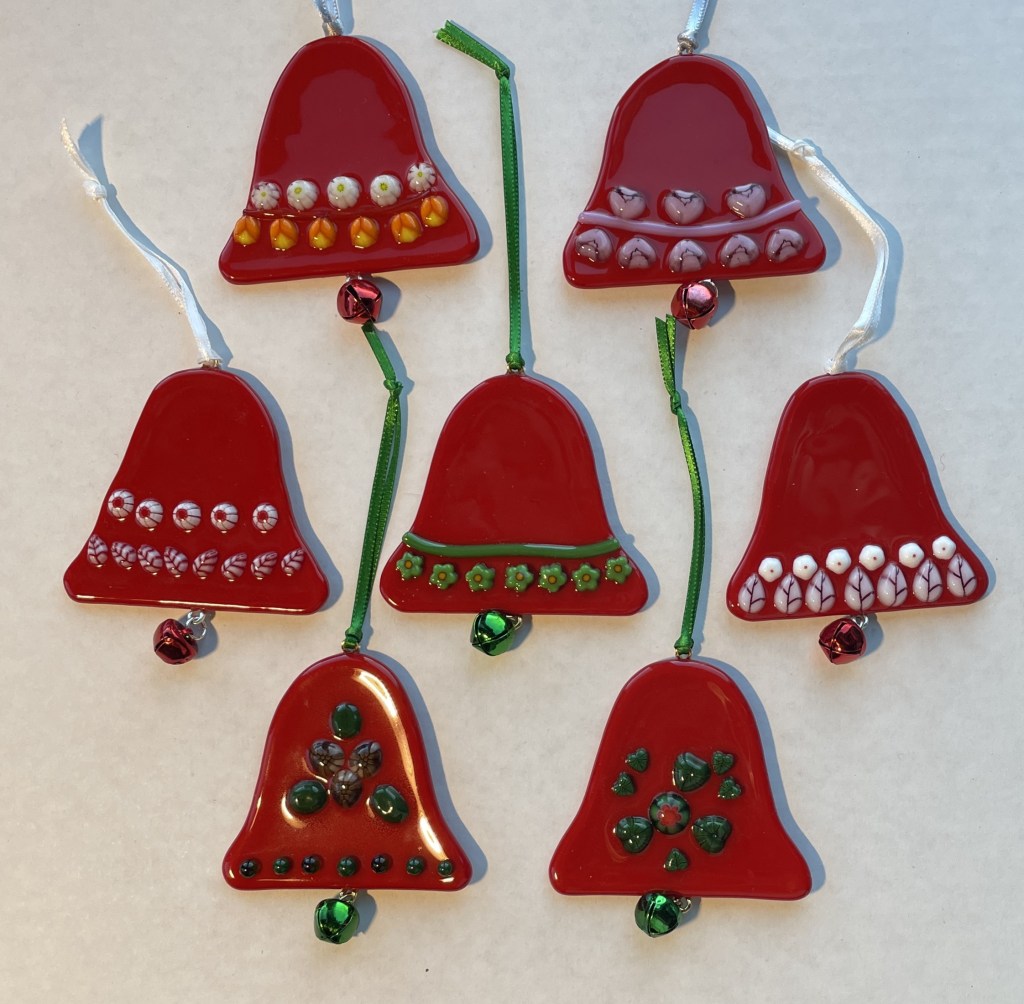
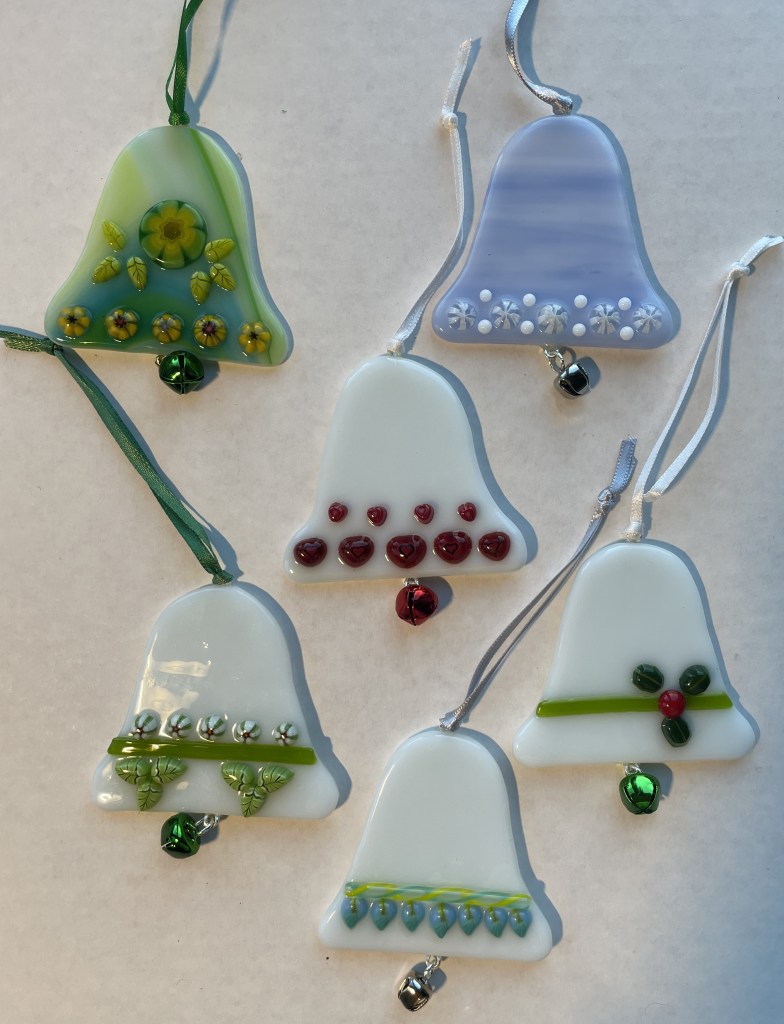
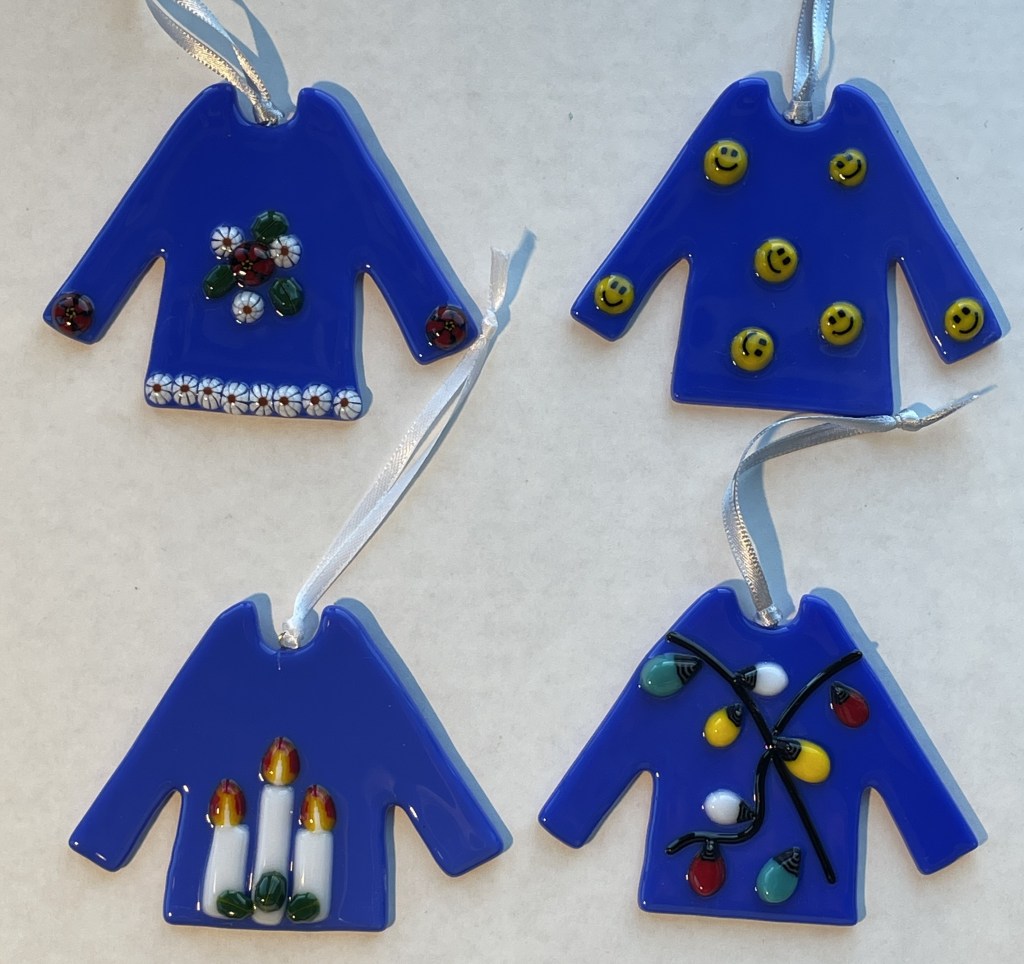
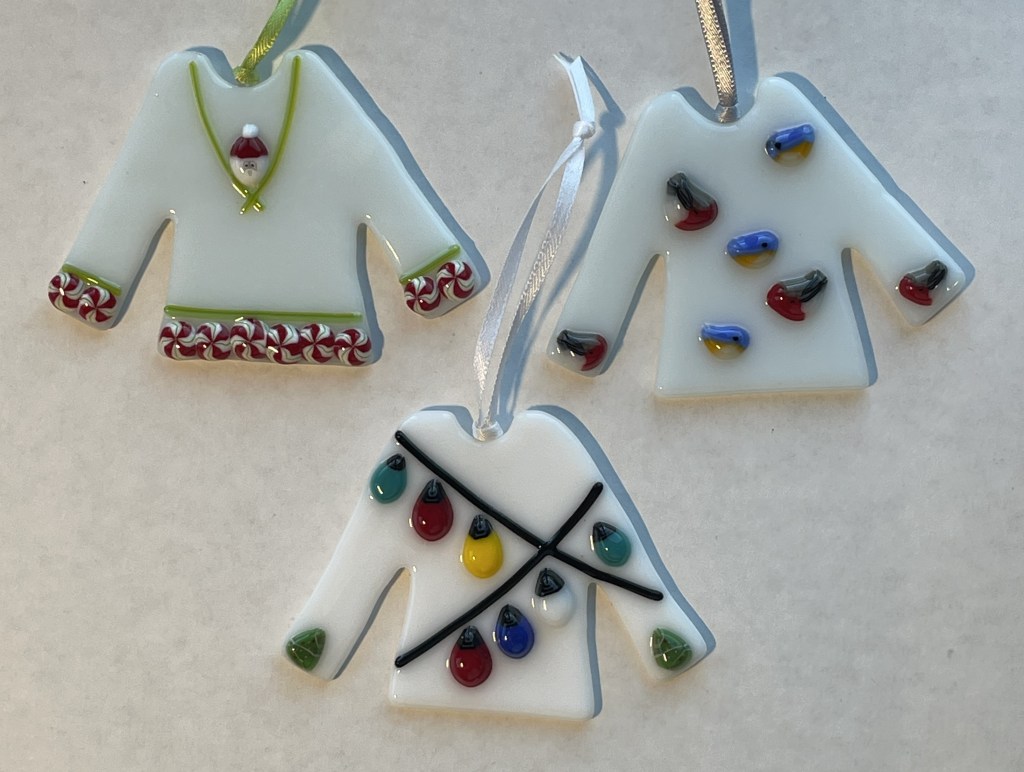
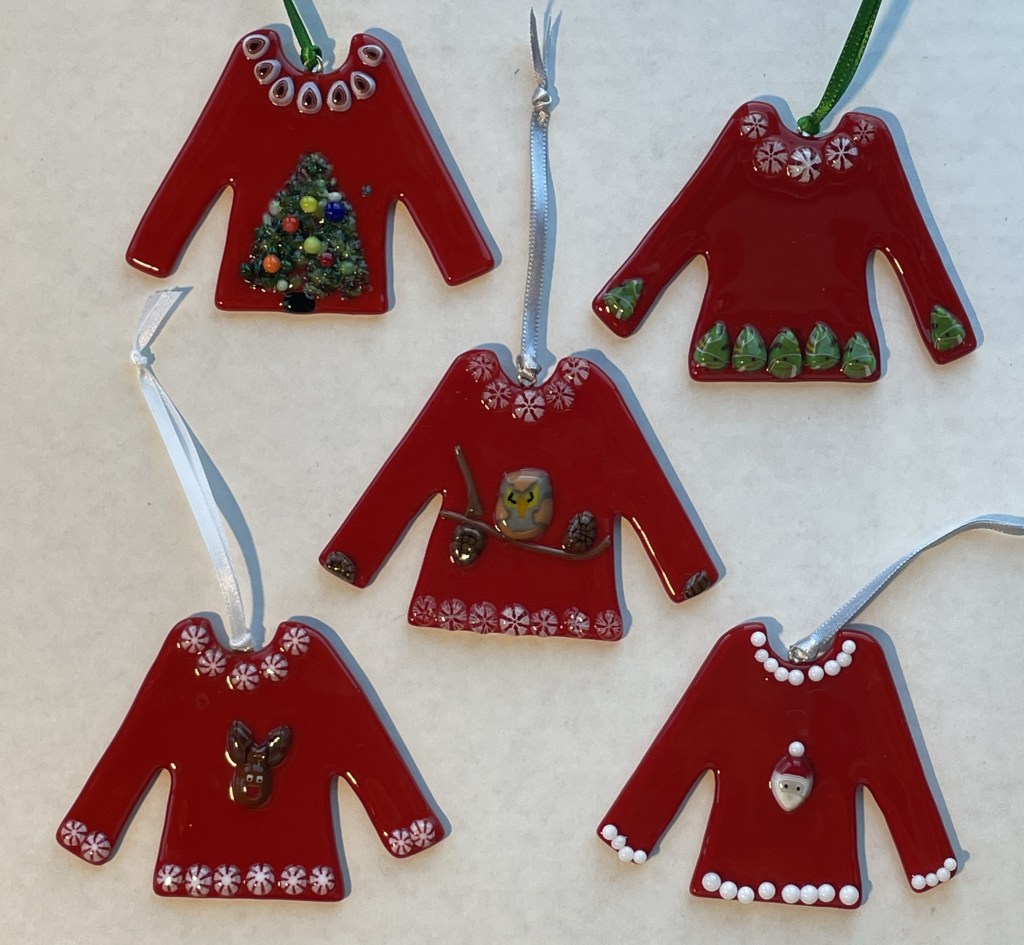
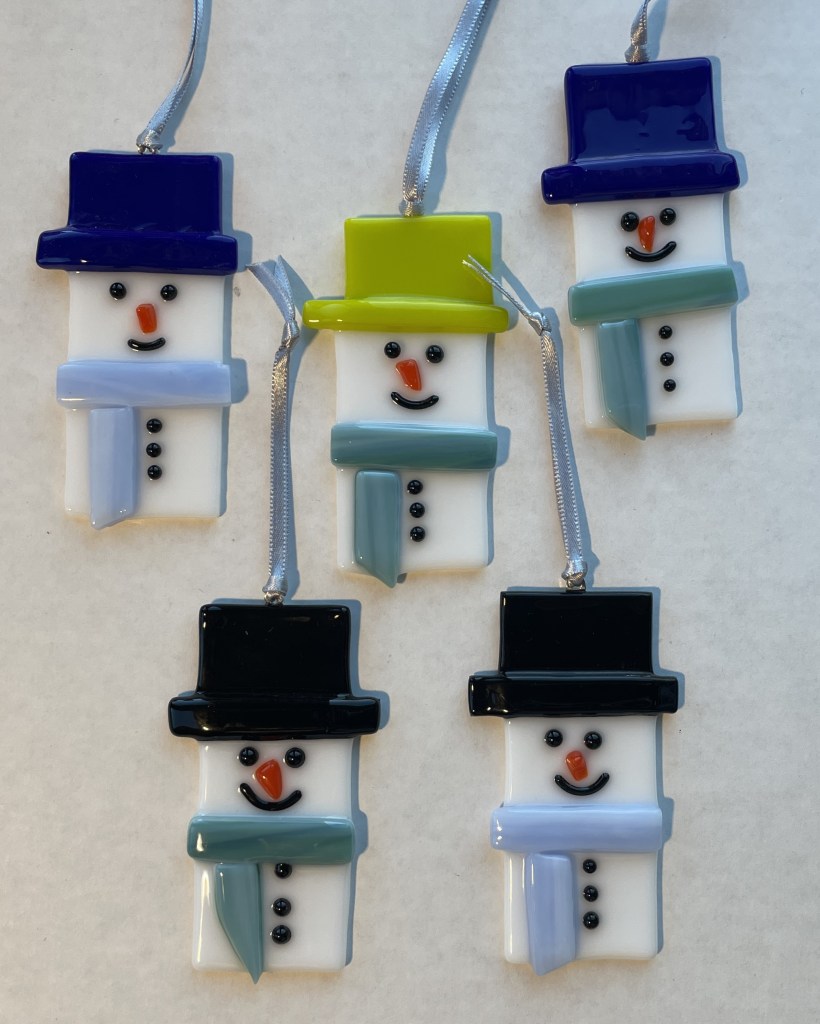
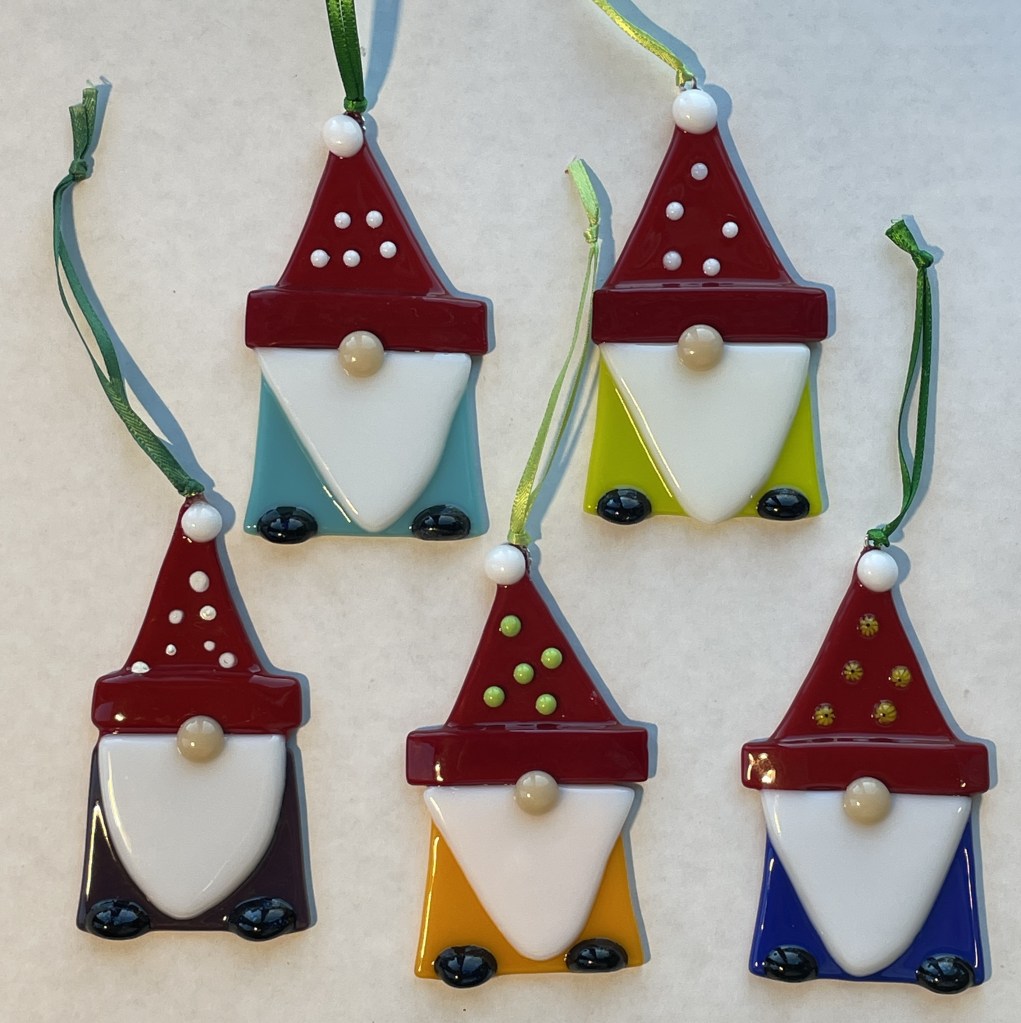
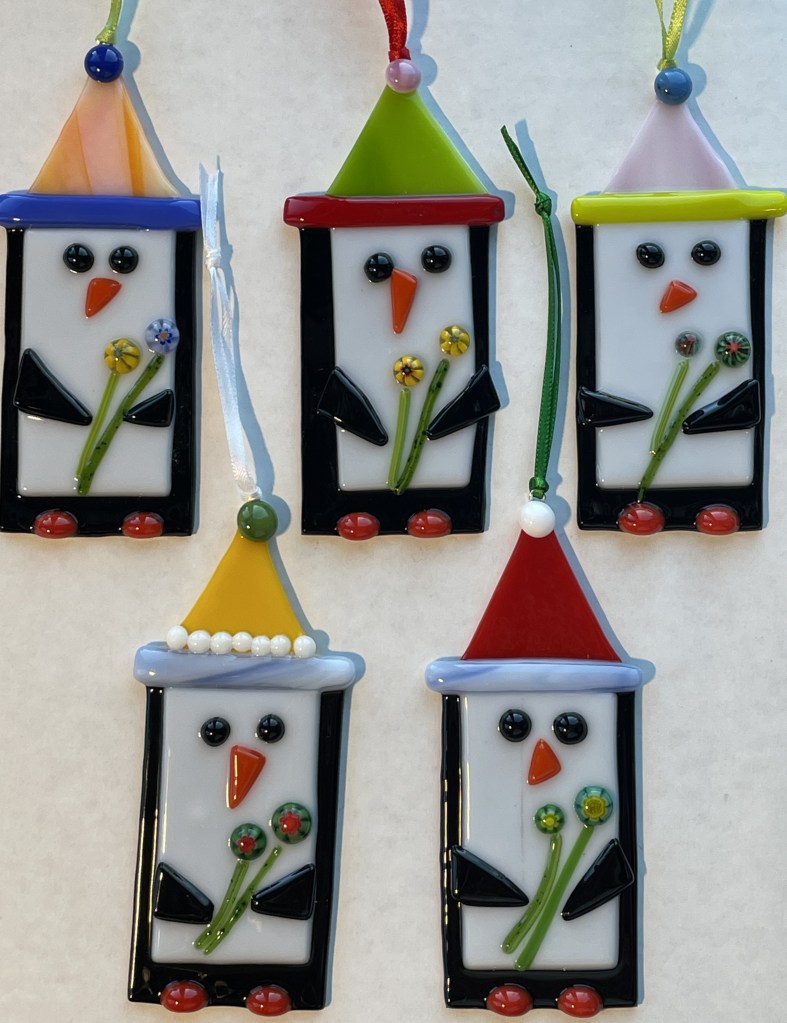
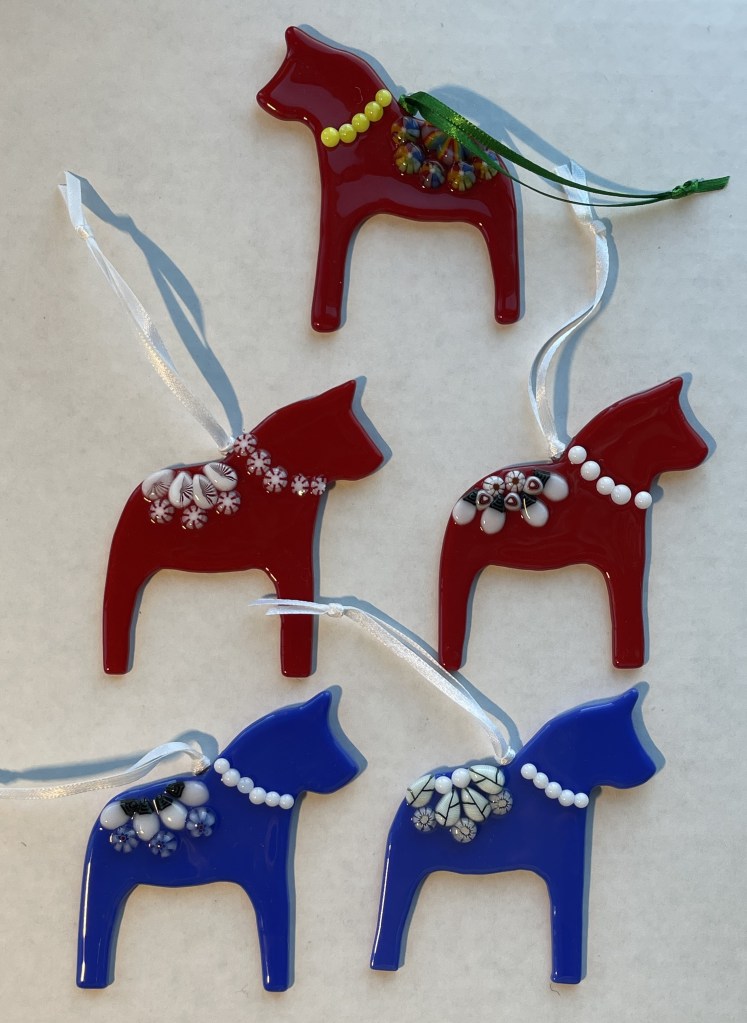
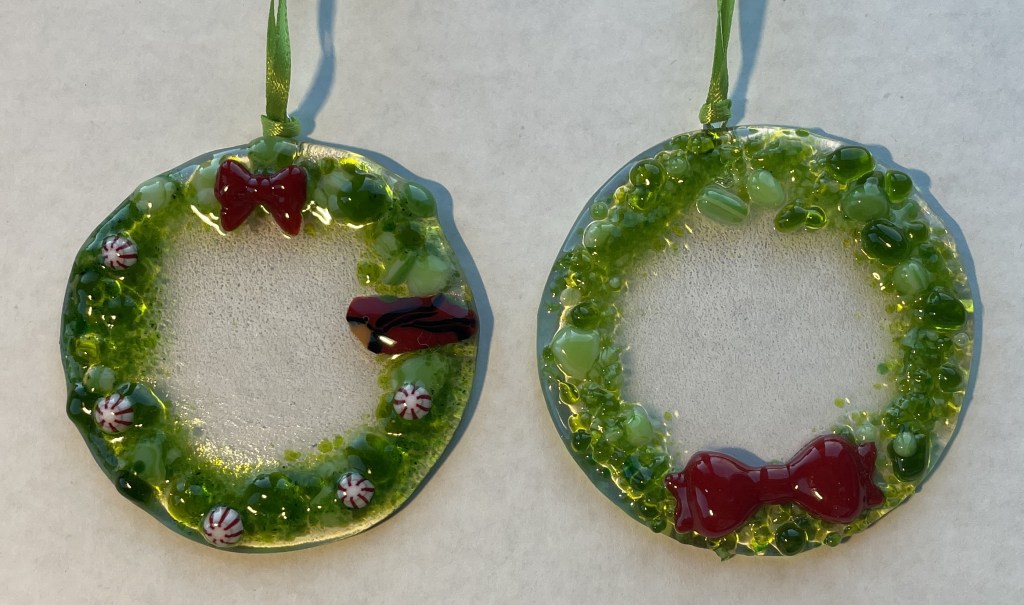
To sell at the market, I brought several of the fused glass bowls and art pieces that I have made. Having participated last year, I knew that tree ornaments would also be popular. So, I spent a couple weeks this fall creating several variety of ornaments.
Bells:
Christmas Sweaters:

Santas, Snowmen and Gnomes:

Penguins, Mittens and Dala Horses:

Nativity:

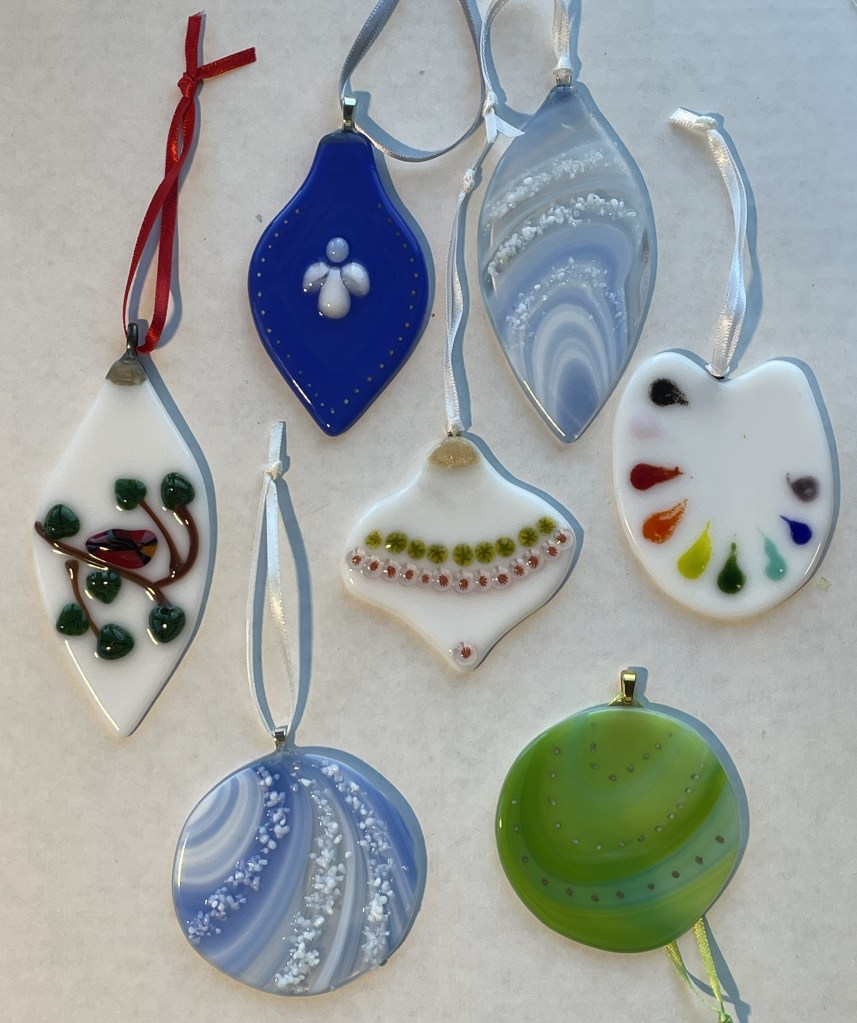
Assorted other designs:


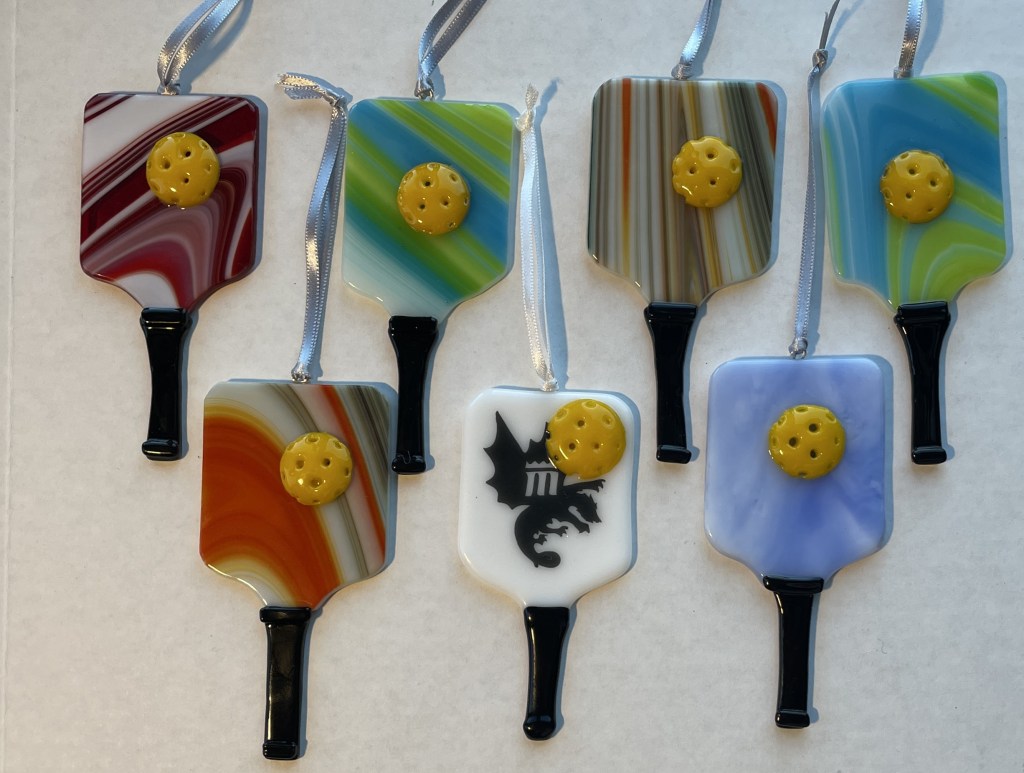
And even Pickle Ball Paddles:
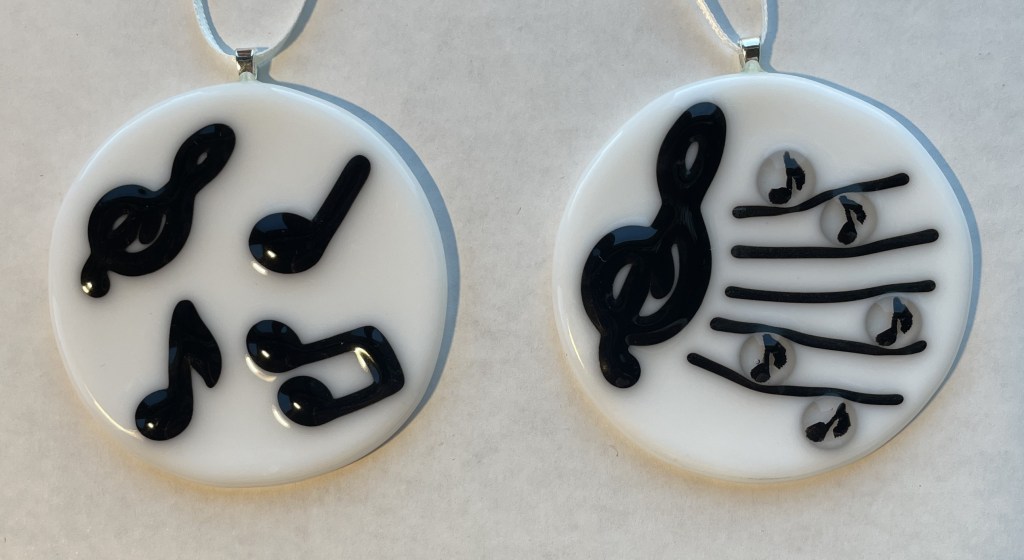
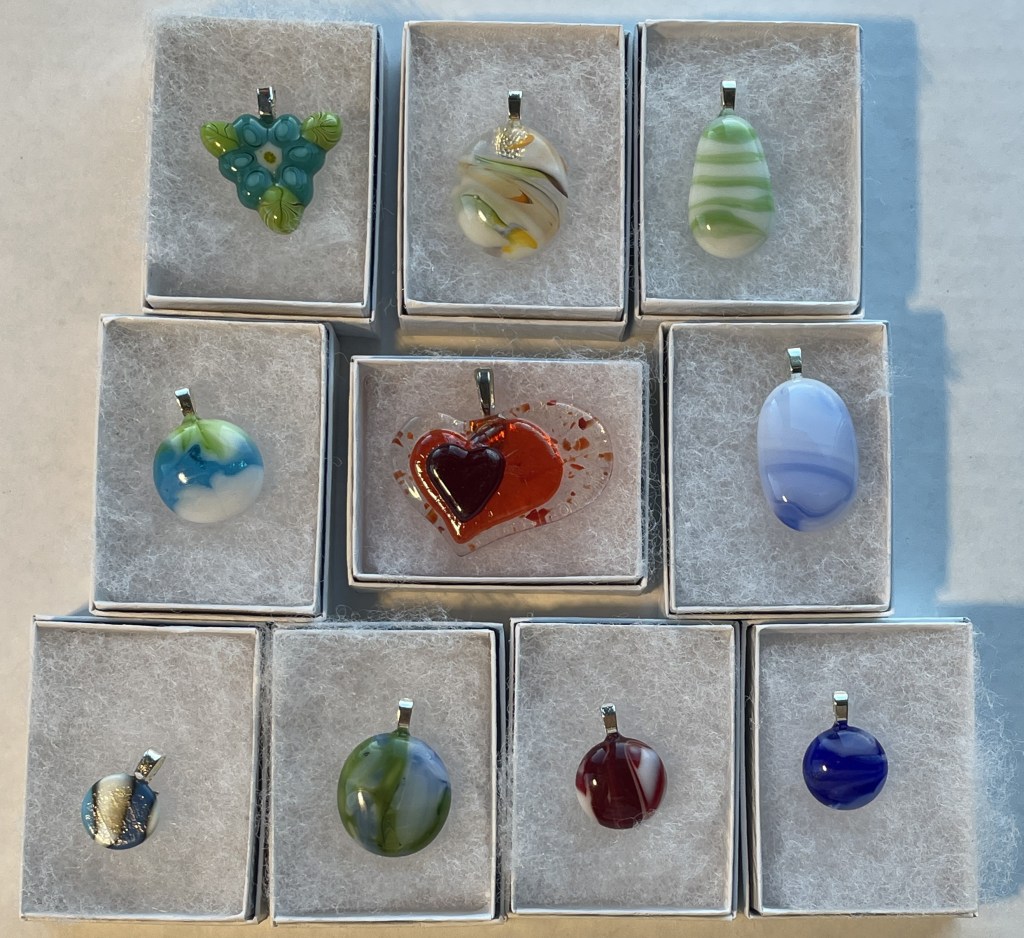
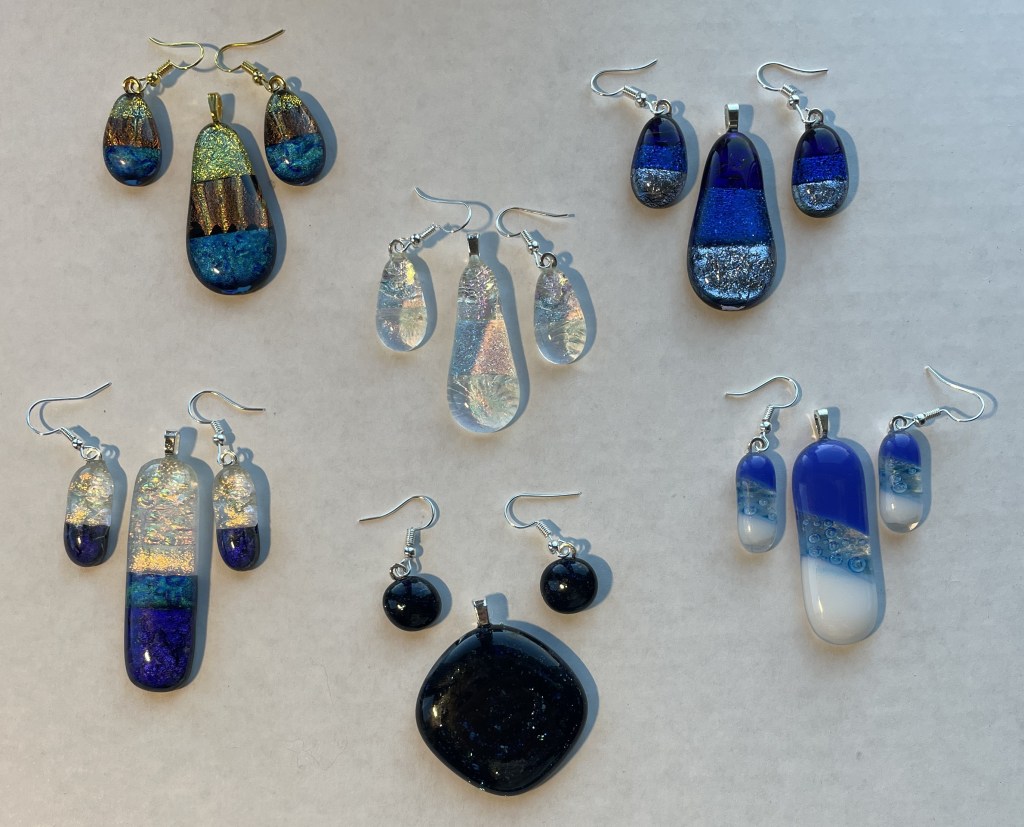
I also made some jewelry (pendants and earrings):

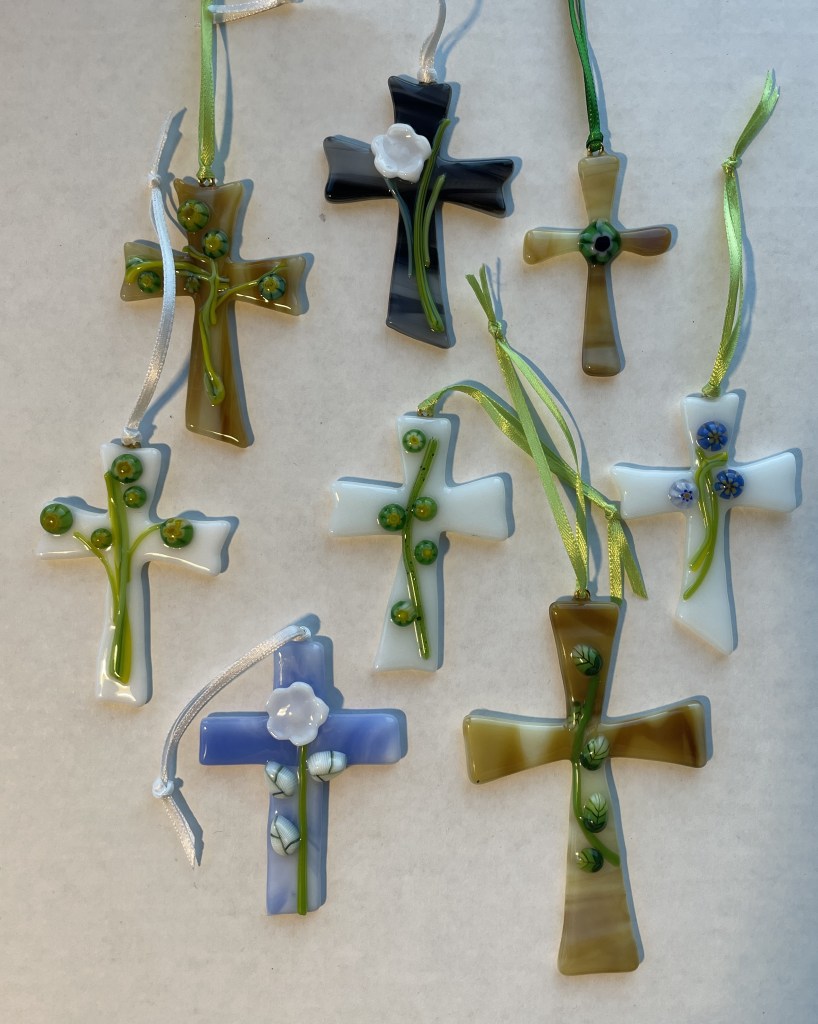
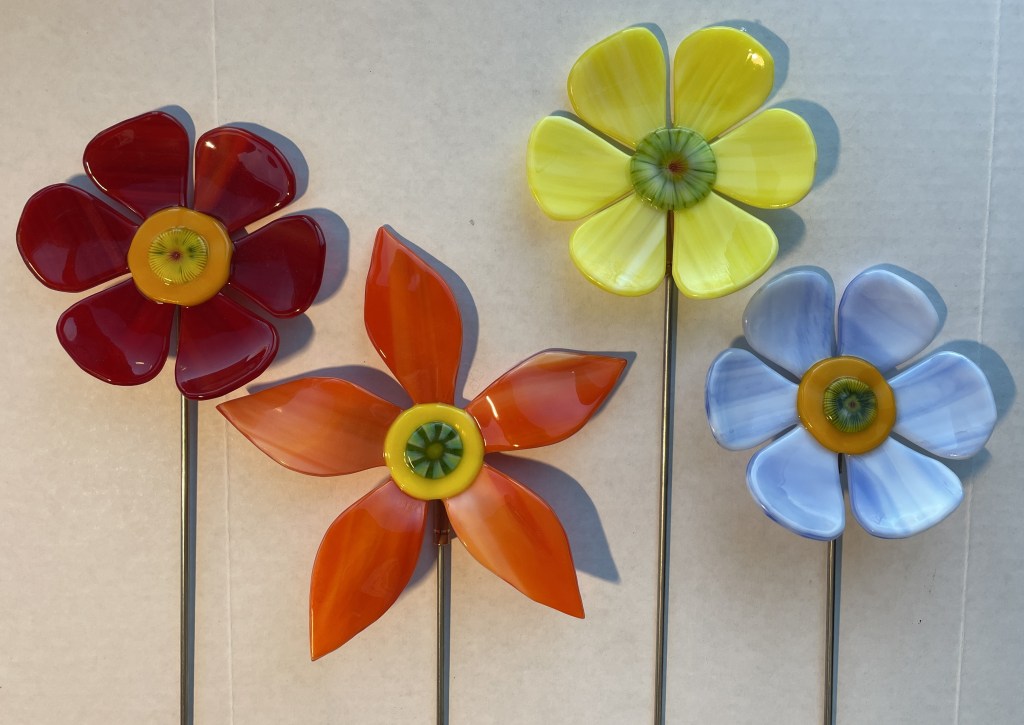
And Garden Flowers:
The Holiday Market was very successful raising a nice sum of money for south metro mission outreach programs. And, I had lots of fun making the items to sell.
I know it is too late for this Christmas. But, if you see anything in this post that you would like me to make for you for next year, please send me a message and we can make arrangements for me to get the item(s) to you. Half of what I make from selling these items will be donated to the missions outreach.
I am also hoping to participate in a Spring Market this year and am looking forward to making more garden art and Easter items. If I do participate, I will post pictures of the items that I make.
Merry Christmas, everyone!
This morning, I needed to stay at our house to await a FedEx delivery that required a signature. Not knowing when the delivery would arrive, I didn’t want to be sewing or working in my glass studio because the noise may have kept me from hearing the door bell. So, I decided it was a good day to do some holiday cookie baking.
After I was finished baking, I found out that today was actually National Cookie Day. So, I guess I made the right decision as to how to spend my day.
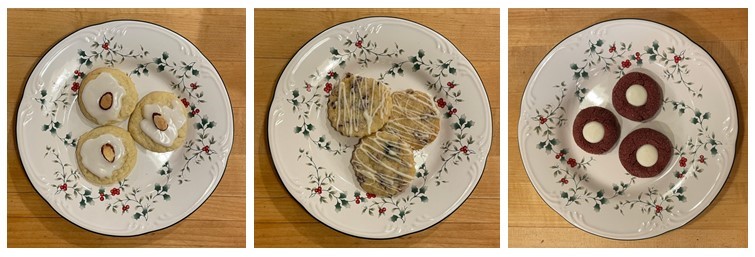
Each year, I try some new recipes as well as bake some favorites from previous years. One of the new recipes I tried this year was Soft Almond Sugar Cookies. This recipe showed up on my Instagram Feed and I since I love almond flavoring in cookies, I decided to give it a try. The recipe can be found on a blog called Broken Oven Baking. I made a slight change to the recipe. As written, the recipe makes 8 large cookies (3-4 Tbs of dough for each cookie). I really did not want cookies that size, so I made smaller ones with 1 Tbs of dough.
These cookies are really good, especially if you enjoy almond flavoring.

The second recipe I tried was Buttery Cranberry Orange Shortbread Cookies. This was another recipe that showed up on my Instagram feed. The recipe can be found on a blog called Tutti-Dolci. The fresh orange zest really makes the flavors zing. I made a minor change to this recipe as well. Not wanting to hand chop the dried cranberries, I put them in the food processor with the sugar and orange zest. This worked really well and the sugar kept the cranberries from getting stuck the the processor blade.
The flavor is amazing. I think the may be my new favorite cookie!
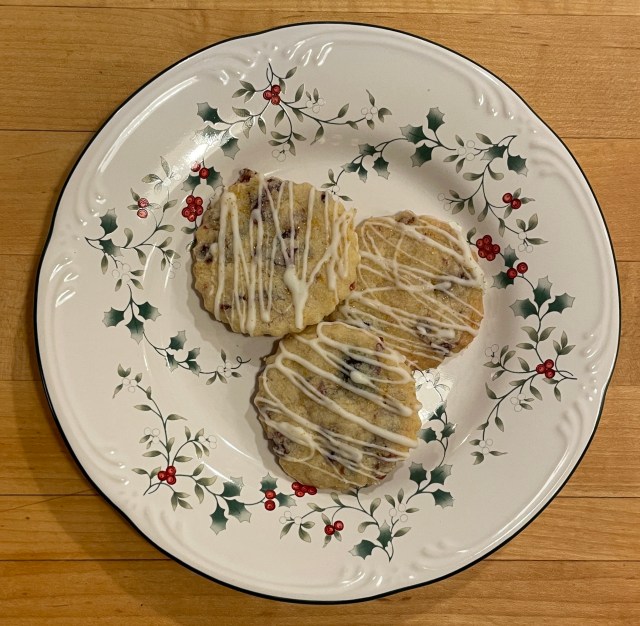
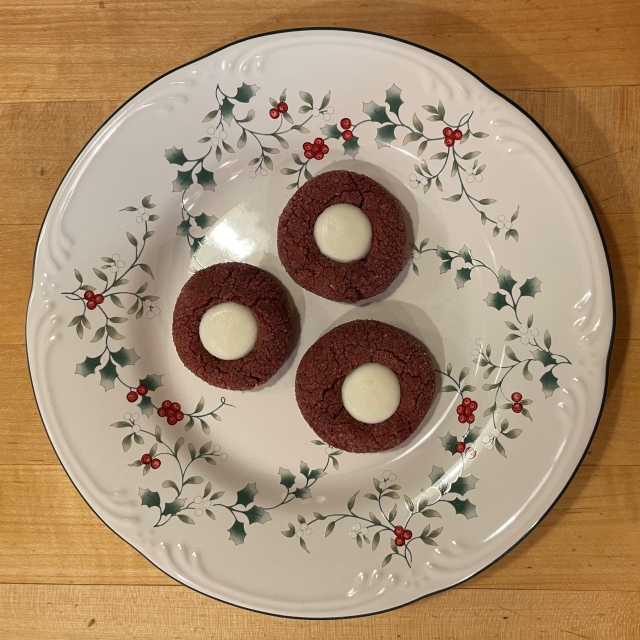
Lastly, I made a recipe that has become a favorite for the holidays, Red Velvet Cookies. The recipe can be found in a previous posting.
Wednesday, I plan to make my holiday candies. Each year, I make Peanut Brittle and English Toffee, recipe found in a previous post, as well as Pretzel Kiss Candies.

I really like when a new project turns out close to what I envisioned.

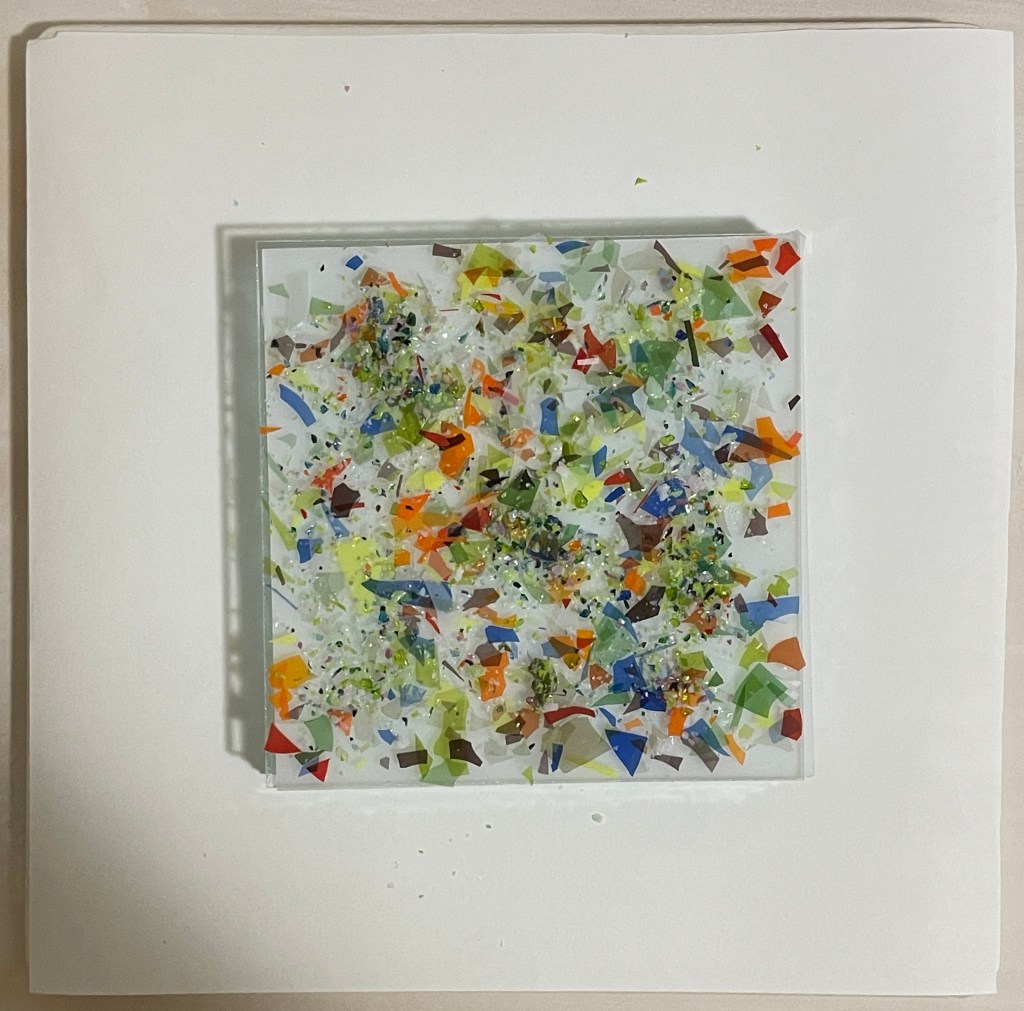
I’ve previously only done one frit flow project, with homemade frit, and was pleased with the result. With this technique, frit and/or glass shards are placed on top of a stack of glass and allowed to spread out at full fuse temperature. The result creates a wonderful optical effect.

This weekend, when organizing my supplies, I came across a ceramic pot melt mold I had custom made several years ago. This mold has holes only around the perimeter of the pot.
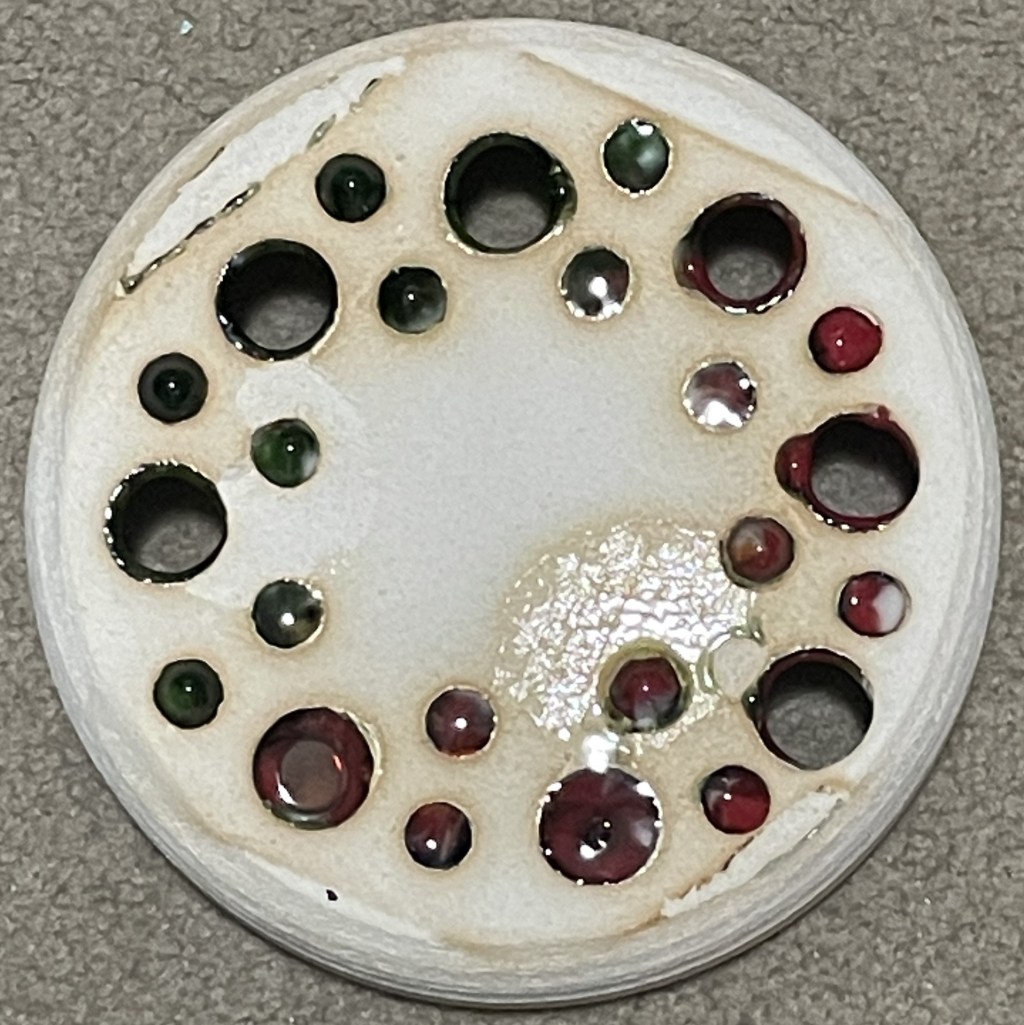
When I saw it I thought I would try putting just small amount of glass in the pot, hoping to get the flow to look like flowers (ie: poppies). And, wanting to try another frit flow, I decided to use that technique for the background.
I tried a two sided frit flow, but didn’t like how it looked. So, not wanting to waste glass, I broke it into four pieces and stacked them. The weight of these pieces was 680 gm. On top I added a piece of white glass with frit divided into two areas. Top half was a combination of blues. The bottom half was a combination of shades of green. The weight of the white glass and frit was 115 grams.

This is how the frit flow turned out.
On top of this, I placed some green vitregraph for the flower stems.

Then I setup my pot melt with red glass (90grams) and orange frit (25 grams) above the holes in the top half of the pot. Above the holes in the bottom half, I put pieces if green glass (70 grams).

I am really pleased how this turned out and can’t wait until next summer when I can display it in a glass stand in my garden.

Having several glass landscape design ideas, my latest glass projects were made for a bathroom in our house.
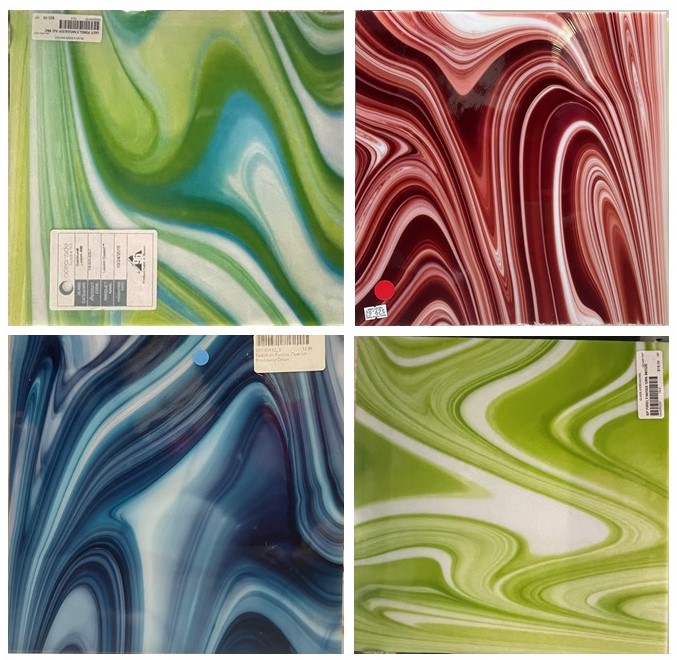
My first landscape was designed to use some of the beautiful Opal Art glass that I had purchased on my trip back from South Carolina in February. This type of glass is absolutely lovely with its rich colors swirled together.
To design the landscape, I took photos of the sheets of glass, printed them, cut out some of the curves to depict mountains and taped the pieces together to figure out what worked best. I was really excited about my first design.
Each of the sections of glass were carefully cut and then full fused to create the background.


Unfortunately, when I opened the kiln the next day, I was extremely disappointed – the glass had large bubbles in the surface. Further testing of the kiln shelf that I had recently purchased showed that the shelf had micro defects in the surface that caused air to be trapped thus creating these large bubbles. Subsequent tests of the kiln shelf resulted in bubbles in the exact same spots. I’m still working with the manufacturer to try to get the shelf replace. I salvaged the bubbled glass for some pot melts and drip melts that I will share in a later blog post.

Using an older shelf, I designed and fused another landscape. I did simplify the design when cutting the glass. Luckily no bubbles developed this time!!


After full fusing the background, I added details, murrini, frit, etc and contour fused the project. The result turned out really well.

The second landscape I made was more of a floral scene rather than a landscape. For this piece of wall art, I used scrap strips of green glass full fused to create an interesting background. Onto this, I tacked some murrini and several practice pieces of lamp work glass (leaves and flowers) from a class I had taken a few years ago. I also included some freeze and fuse leaves and butterflies and some custom cut flowers.

The result in a playful, colorful bunch of glass flowers.

The third piece of glass art was a trial at making a pattern bar. For this trial, I layered glass frit and scraps in a pattern trying to replicate a tree. After full fusing at 1475 degrees, I sliced the resulting bar into 1/4″ sections. Two sections placed opposite one another gave somewhat of a tree appearance. While not great, this was a successful trial run and I will be trying more pattern bars in the future.


To enhance the look of the tree, I added some additional green frit and full fused again.

My final landscape was actually two panels. While visiting my mother in the spring, I saw a wall quilt which depicted farm fields with a city skyline in the background. At the time, I thought the idea would work well for a glass art project. To create the background, I cut and full fused several different pieces of glass to make the “patchwork” fields.

To embellish my idea, I thought it might be fun to include some buildings of the Minneapolis and St. Paul skylines. Hopefully, if you know the Twin Cities, you can recognize the buildings that I have included. These were contour fused to each panel.

The new art is mounted on the wall in one of my bathrooms and adds a bright pop of color to the room.

I really enjoy my many hobbies. However, to keep making new items, I need to have a reason to do so. With most of crafts, I have found organizations to donate items to. This allows me to keep trying new techniques and ideas. The quilts I make are donated to Sleep in Heavenly Peace. The hats and scarves are donated to Hats and Mittens MN. Some of my glass art has been donated to charity auctions.
Unfortunately, I have not identified an organization that I can regularly donate glass art to.
This spring, while wanting a reason to work in my glass studio, I walked around my house looking for places that could use some new art. One of the areas I identified was our upstairs bathroom. About 15 years ago, I remodeled this bathroom and decorated with inexpensive coastal themed wall art. Since the pictures were starting to fade, it was time to redecorate again.
Keeping with the coastal theme, I made a couple underwater scenes for the tub room.
The background was made by contour fusing turquoise/clear steaky glass for the water and beige glass with medium frit of various shades of brown for the bottom of the under water scene.

I made coral with strips of beige glass and with fine frit shaped and then coated with frit powder.


Various types of sea life murrini and vitregraph stringers were added to create bottom of the sea the scene.

A second scene was made to create the top of the sea. White and blue frit was used to designate the top of the ocean. Clear and blue dichroic frit was formed into the body of a large jellyfish and clear dichroic stringers were shaped and placed for the tentacles. More murrini fish were added. Each of these pieces were contour fused and mounted in white frames.

To update the art to the sink room, I incorporated a couple of my hobbies – glass and quilting.
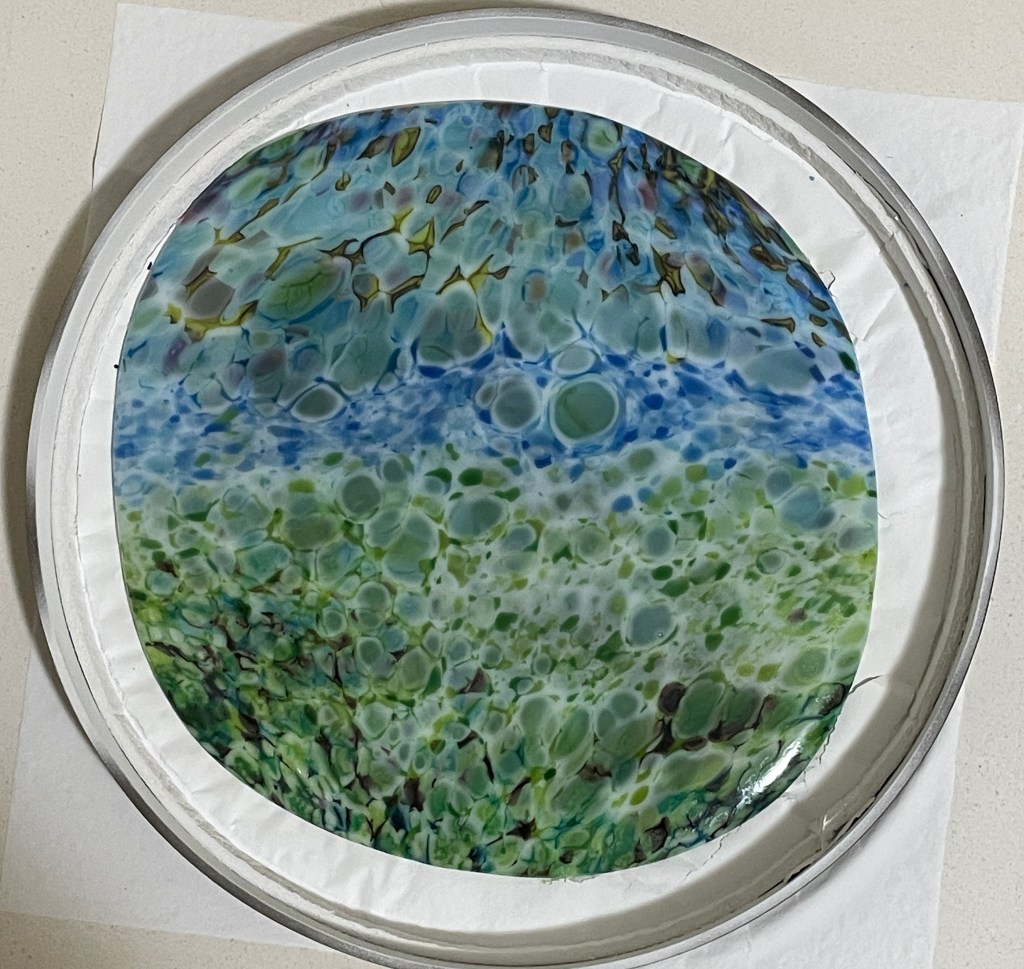
Glass “waves” have been a very popular by other glass artists, and something that I really wanted to try to make. After cutting an 8″ circle of clear glass, I used scraps of blue and turquoise glass along with coarse and medium frit. After placing the pieces of glass, the project was contour fused. The result was amazing and fit the intended area really well.


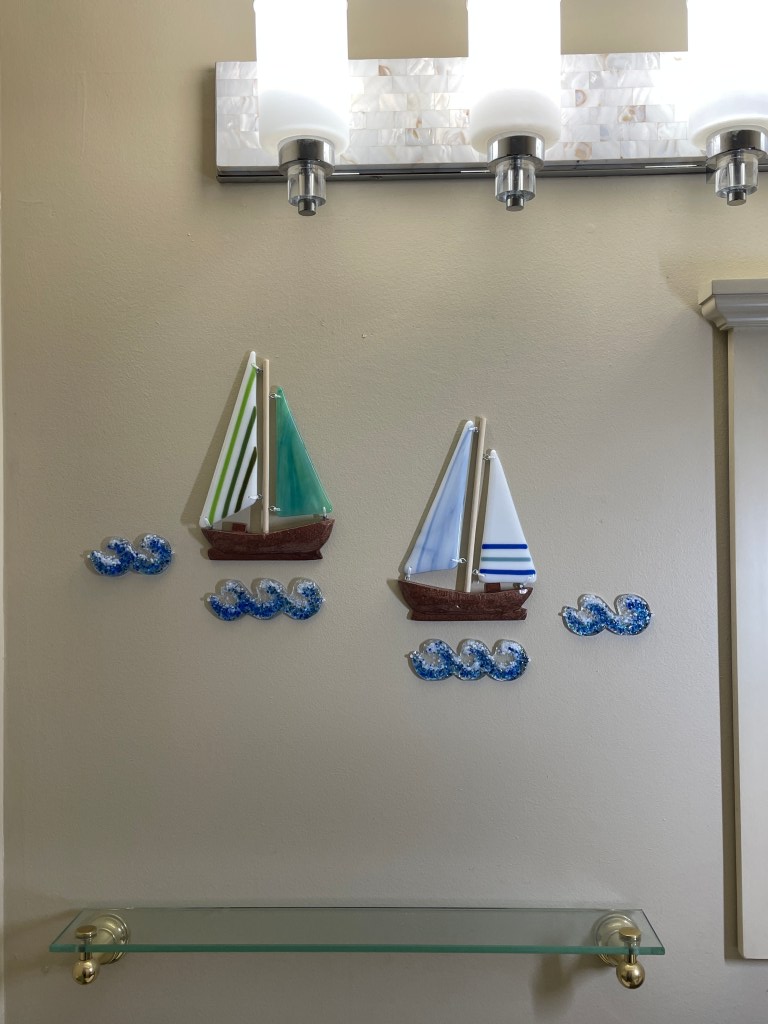
For one of the other walls in the bathroom, a couple of sailboats seemed like a good idea. And, after seeing several glass sailboats designs on-line, I really wanted to try to make one. I did, however, take a slightly different approach than those that I had previously seen. I purchased an inexpensive wooden boat ($9) from Amazon.

After removing the linen sails, I used a bench saw to cut the boat in half lengthwise, and added new masts to each boat.

The wood was painted with copper colored “Hammered Metal” spray paint. The glass sails were made with blue, green and white sheet glass and glass noodles, full fused. And, the sails were rigged with waxed sinew.

To enhance the look of the boats on the wall, I created a couple small “waves” (2″ in height) to match the larger wave that I had already made.

These pieces of glass art created another nice scene for the bathroom.
Lastly, I had one more wall to decorate in the bathroom. And, while thinking about this redecorating project, a small quilt that I had previously made matched the theme of the bathroom.
In 2018, I entered the Quilt On A Stick competition at the MN State Fair. The theme that year was “Up North” and I had made a sailboat with a mariners compass design. Unfortunately, the quilt did not receive a ribbon at the fair. And, since being made, I had been using it as a mug rug in my sewing room. But, now I had a much better use for this little quilt.
Because the quilt was small, I created a couple paper pieced lighthouse quilts from some photos. These quilts depict Split Rock Lighthouse in MN and the lighthouse at Harbour Town in Hilton Head Island.

These were all really fun projects to make, and a nice update to the décor of the rooms.

This is my favorite time of the year. The weather is lovely with highs in the upper 70s and lows in the upper 50s. The flowers are planted, my garden is growing and every day I enjoy being outside working on various projects.
In a couple months, my window box and planters will be blooming and full of color. In the meantime, I have to wait for the flowers to grow and bloom. So, I decided to add some glass art to my window box. A glass butterfly, a couple of glass leaves and glass flowers add some nice color. Once the plants fill in, the window box should look even better.

For these art pieces, the glass was cut from pieces in my scrap buckets, contour fused and then slumped into a ceramic mold. On the back, a two inch piece of 1/4″ copper pipe was attached to each piece and a metal rod inserted to support the art in the window box.
In addition to planting flowers and vegetables, I have also been patching areas of the grass. Up until a few years ago, I had a rain barrel under the downspout in the back of our house to collect the rain water. Unfortunately, this rain barrel cracked after many years of use. Without the rain barrel, during a rain storm, the flow of water can be very strong and the surrounding ground is eroded and the grass does not grow well.

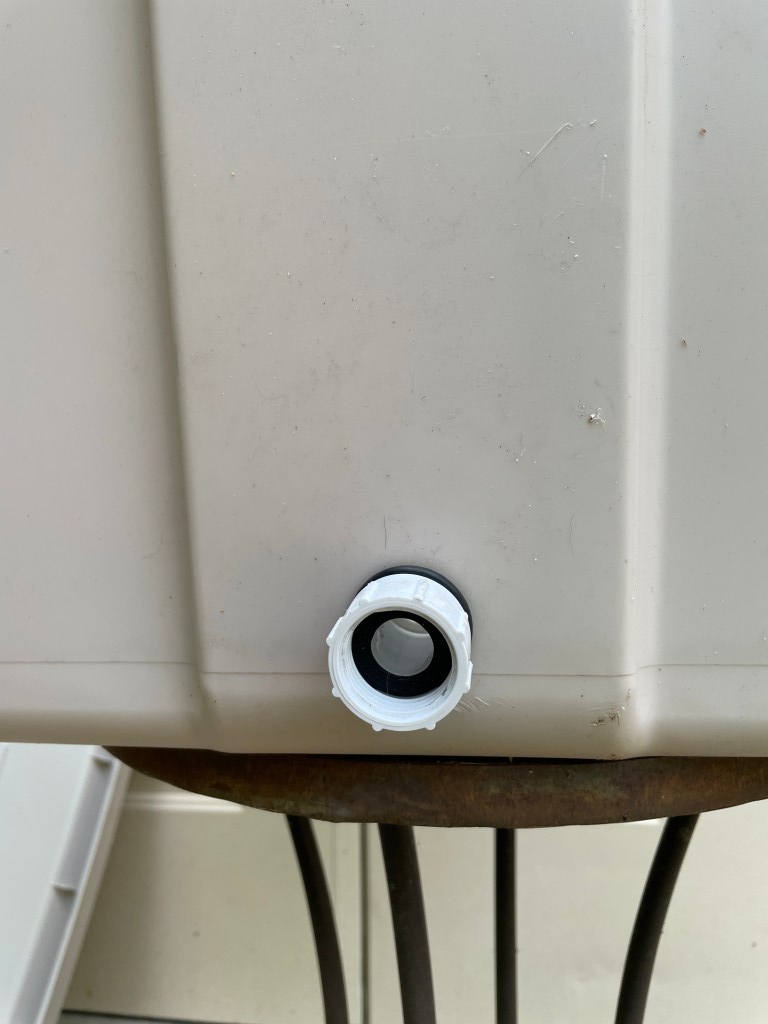
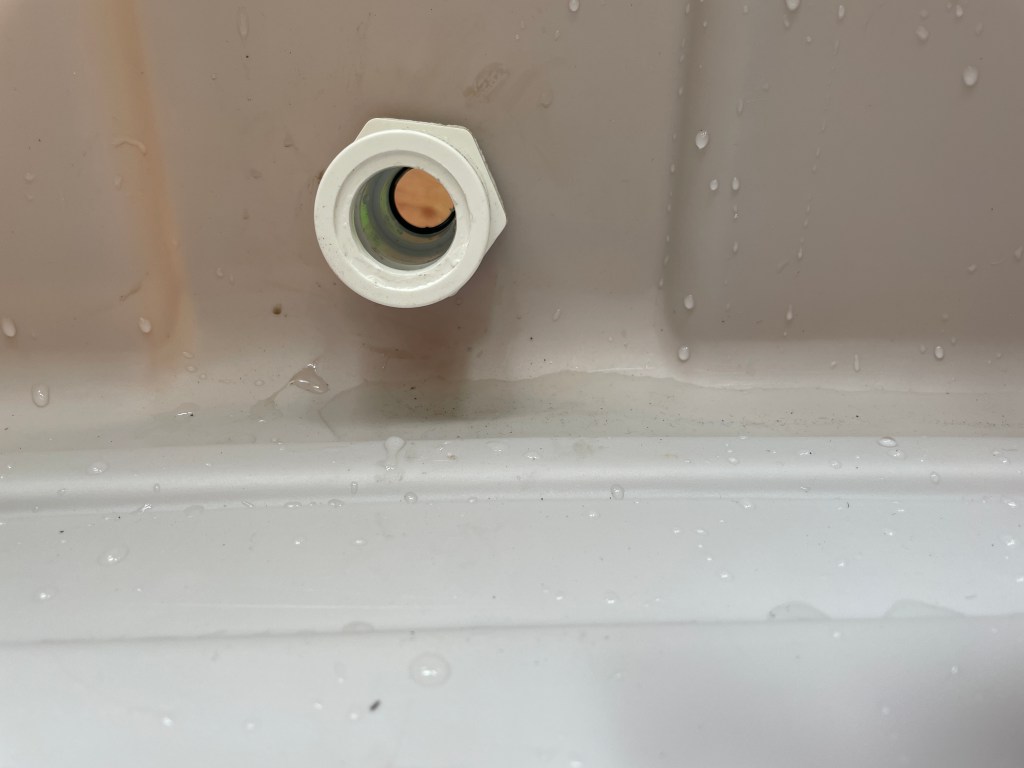
To try to improve this area of the lawn, I thought about purchasing another rain barrel. Unfortunately, they are rather expensive and larger than I would prefer. Instead, I decided to try to make my own. After drawing out some ideas I put together the necessary supplies, an old Rubbermaid tote, some PVC connectors, a shutoff coupling and two rubber washers.

A one inch hole was drilled in the side of the tote and the edges of the cutout smoothed with a metal file. A 1″ washer was placed over the end of a 1/2″ Slip x 3/4″ FHT PVC hose fitting and pressed into the hole that had been drilled in the side of the tote. To hold the fitting in place, another 1″ washer was placed over the end on the inside of the tote another coupling was placed over the PVC fitting.

To collect the water from the downspout, a hole was cut in the lid of the tote.

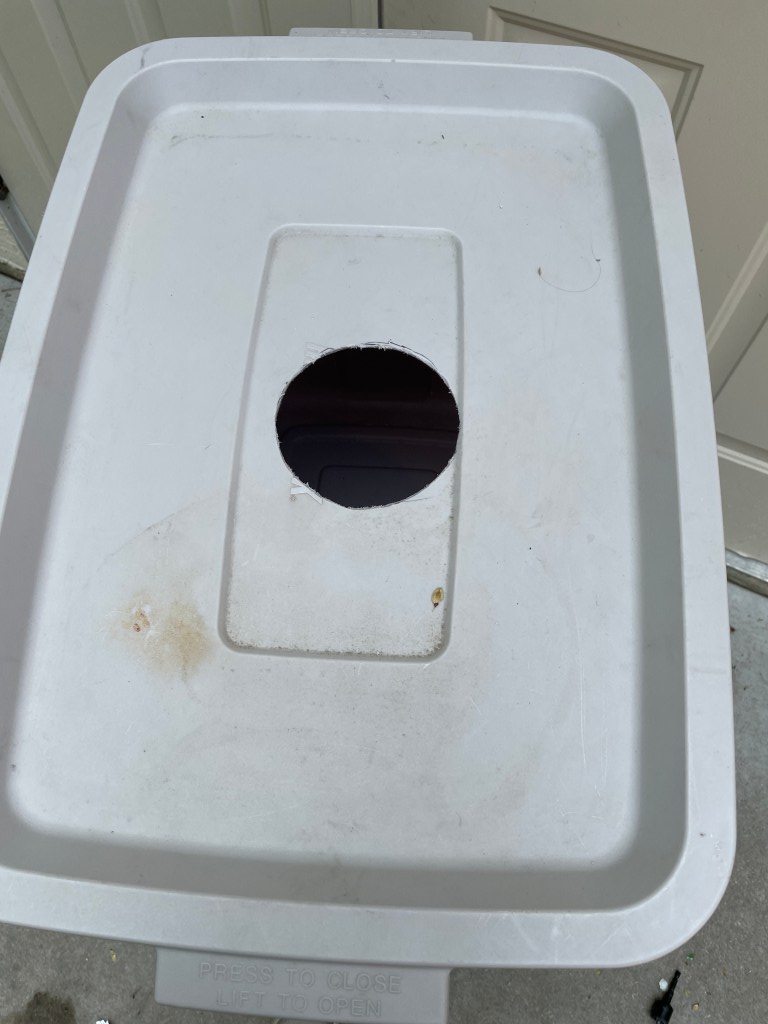
A diverter was attached to the downspout and the length adjusted to fit into the tote lid. A brass shut-off coupling was screwed into the outside of the fitting to be able to open and close the opening. The tote was placed on several brick pavers to raise the tote high enough to access the shutoff valve. The water collected will be used for watering the plants in my back yard.

Of course, I had to add some decorative art to this functional item. Using my Cameo cutter and some permanent vinyl, I added a couple cats (that match the metal cats on my raised bed gardens) and some grass. While I am unsure whether these vinyl decorations will last, they do add some whimsy to my project. And, hopefully the grass will grow better in this area of the yard.

Another gardening project was to update the watering system in my raised beds. Last year, I used soakers hoses to keep my garden watered. This year when I connected the soaker hoses, I discovered that the hoses (advertised as “leak proof”) had cracked in several location.
To replace them, I wanted something that may last longer. Using two 10 feet pieces of 1/2″ PVC, several couplers, a couple caps and a couple hose fittings, I made new waterlines. A PVC to hose fitting was attached to each water outflow on a timer. The PVC was cut and connected with couplers to create a waterline to each raised bed.
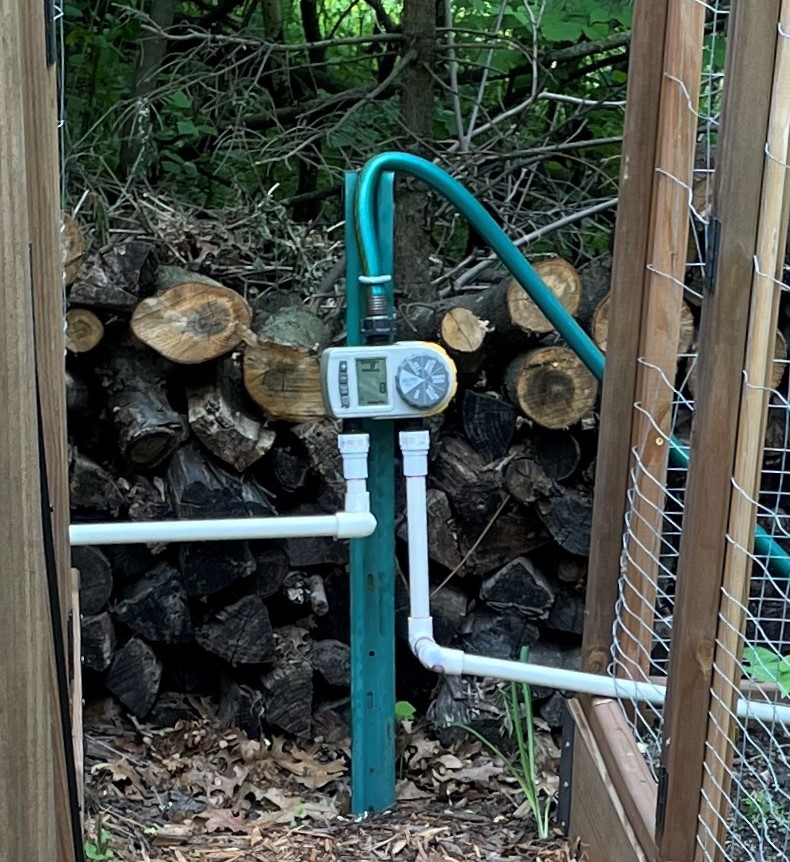
For each of the raised beds, 1/8″ holes were drilled every 2 inches along both sides of the length of a 90″ piece of pipe with a cap at the end of the tube.
This new watering system works great. It does come apart into sections that can be stored indoors in the winter and will hopefully last more than one year.

Happy Planting Everyone!


